Kubernetes for Developers #22: Access to Multiple Clusters or Namespaces using kubectl and kubeconfig
In the previous article (Kubernetes for Developers #21: Kubernetes Namespace in-detail), we added name of the namespace in all kubectl commands to create or display kubernetes resources. Because kubeconfig current context referring to default namespace.kubeconfig file gets created automatically when you install k8 in the machine. It is usually located in the ~/.kube/config . This file contains all the necessary information to connect k8 cluster. kubectl CLI uses this file to execute commands against k8 cluster.
The following kubectl command display all pods from dev-ns namespace as current-context (i.e. my-test-context) referring to dev-ns namespace
run following command to modify namespace for the context
As said earlier, every context consists of three parts
2. User details:
Use following kubectl command to combine all above three details for creating new context
Happy Coding :)
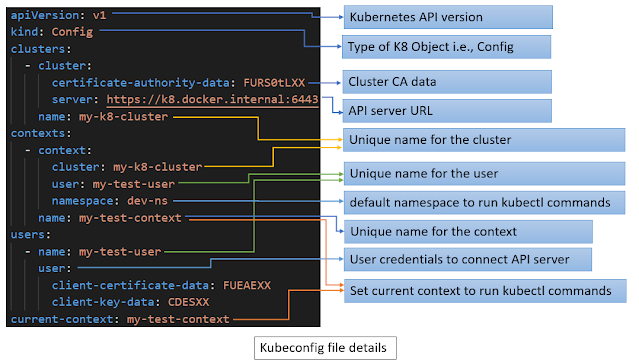
Kubeconfig file
kubeconfig file contains four major sections
- clusters: it contains list of cluster details like name of the cluster, API server URL, Certificate Authority (CA) file, etc.
- users: it contains list of user credentials (like name, password, user token, certificate) for connecting an API server
- contexts: it contains combination of cluster name, user name and namespace. It is used for kubectl CLI when executing commands against k8
- current-context: Always one combination of context (i.e. name of cluster, user, namespace) must be set as current context. (i.e. cluster name + user name + namespace name )

run following command to view kubeconfig file details
$ kubectl config view
apiVersion: v1
kind: Config
clusters:
- cluster:
certificate-authority-data: FURS0tLXX
server: https://k8.docker.internal:6443
name: my-k8-cluster
contexts:
- context:
cluster: my-k8-cluster
user: my-test-user
namespace: dev-ns
name: my-test-context
users:
- name: my-test-user
user:
client-certificate-data: FUEAEXX
client-key-data: CDESXX
current-context: my-test-context
// display all contexts
$ kubectl config get-contexts
CURRENT NAME CLUSTER AUTHINFO NAMESPACE
* my-test-context my-k8-cluster my-test-user dev-ns
// display current context
$ kubectl config current-context
my-test-context
// display pods
$ kubectl get po
NAME READY STATUS RESTARTS AGE
pod-nginx-dev-ns 1/1 Running 0 4m4s
// modify namespace for the given context
$ kubectl config set-context my-test-context --namespace=dev2-ns
Context "my-test-context" modified.
// the below command display all pods from the dev2-ns namespace
$ kubectl get po
NAME READY STATUS RESTARTS AGE
pod-nginx-dev2-ns 1/1 Running 0 1m4s
Create new Context
- Cluster details: use following kubectl command to configure new cluster details
// syntax
// kubectl config set-cluster <cluster-map-name> --server=<cluster-url> --certificate-authority=<ca-file>
$ kubectl config set-cluster my-new-cluster \
--server=https://mycluster.k8.com:6443 \
--certificate-authority=/path/cafile
Cluster "my-new-cluster" set.
use following kubectl command to configure new user details
// syntax
// kubectl config set-credentials <user-map-name> --token=<user-token-info> (or)
// kubectl config set-credentials <user-map-name> --username=<username> --password=<password>
$ kubectl config set-credentials my-new-user --token=token1234abcd
User "my-new-user" set.
3. Namespace details:
use following kubectl command to view namespace details
// display all namespaces
$ kubectl get ns
NAME STATUS AGE
default Active 31d
dev2-ns Active 47m
dev-ns Active 47m
// syntax
// kubectl config set-context <context-name> \
--cluster=<cluster-name> \
--user=<user-name> \
--namespace=<namespace-name>
$ kubectl config set-context my-new-context \
--cluster=my-new-cluster \
--user=my-new-user \
--namespace=dev-ns
Context "my-new-context" created.
//display all contexts
$ kubectl config get-contexts
CURRENT NAME CLUSTER AUTHINFO NAMESPACE
* docker-desktop docker-desktop docker-desktop
my-new-context my-new-cluster my-new-user dev-ns
// display current context
$ kubectl config current-context
docker-desktop
Use following kubectl command to switch the context
// change the context
$ kubectl config use-context my-new-context
Switched to context "my-new-context".
By default, the following kubectl command display all the pods from dev-ns namespace because CLI using "my-new-context" as current-context
// display pods
$ kubectl get po
NAME READY STATUS RESTARTS AGE
pod-nginx-dev-ns 1/1 Running 0 4m4s
Use following kubectl command to delete the context
// delete context
$ kubectl config delete-context my-new-context
deleted context my-new-context from ~\.kube\config
Kubernetes for Developers Journey.
- Kubernetes for Developers #25: PersistentVolume and PersistentVolumeClaim in-detail
- Kubernetes for Developers #24: Kubernetes Volume hostPath in-detail
- Kubernetes for Developers #23: Kubernetes Volume emptyDir in-detail
- Kubernetes for Developers #22: Access to Multiple Clusters or Namespaces using kubectl and kubeconfig
- Kubernetes for Developers #21: Kubernetes Namespace in-detail
- Kubernetes for Developers #20: Create Automated Tasks using Jobs and CronJobs
- Kubernetes for Developers #19: Manage app credentials using Kubernetes Secrets
- Kubernetes for Developers #18: Manage app settings using Kubernetes ConfigMap
- Kubernetes for Developers #17: Expose service using Kubernetes Ingress
- Kubernetes for Developers #16: Kubernetes Service Types - ClusterIP, NodePort, LoadBalancer and ExternalName
- Kubernetes for Developers #15: Kubernetes Service YAML manifest in-detail
- Kubernetes for Developers #14: Kubernetes Deployment YAML manifest in-detail
- Kubernetes for Developers #13: Effective way of using K8 Readiness Probe
- Kubernetes for Developers #12: Effective way of using K8 Liveness Probe
- Kubernetes for Developers #11: Pod Organization using Labels
- Kubernetes for Developers #10: Kubernetes Pod YAML manifest in-detail
- Kubernetes for Developers #9: Kubernetes Pod Lifecycle
- Kubernetes for Developers #8: Kubernetes Object Name, Labels, Selectors and Namespace
- Kubernetes for Developers #7: Imperative vs. Declarative Kubernetes Objects
- Kubernetes for Developers #6: Kubernetes Objects
- Kubernetes for Developers #5: Kubernetes Web UI Dashboard
- Kubernetes for Developers #4: Enable kubectl bash autocompletion
- Kubernetes for Developers #3: kubectl CLI
- Kubernetes for Developers #2: Kubernetes for Local Development
- Kubernetes for Developers #1: Kubernetes Architecture and Features
nice article keep on
ReplyDelete