Tuesday, April 28, 2020

Docker Assignments #11: Node.js, MySQL and Dockerfile

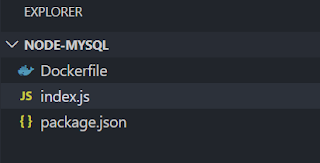
Create a folder structure as per below image in the host machine


  1. Pull mysql:5.7 docker image into host machine
  2. Write docker run command by setting following options
  • enable detached mode
  • set container name as "testmysql"
  • map host port number to 3500
  • set MYSQL_ROOT_PASSWORD as “mysql123”
      3. Check testmysql container up and running
       4. Enter container using docker exec
       5. Connect to database using mysql CLI client with root user
       6. Create database with name “hr”
       7. Create table with name employee and “id, name” columns under “hr” database
       8. Insert sample data into employee table  
      9. Check “HR” database and “Employee” table with data
      10. Add "mysql" npm package as a dependency in the package.json file
      11. Write required code into index.js file to connect "testmysql" container
      12. Configure Dockerfile with below instructions
  • set base image as "mhart/alpine-node"
  • set working directory  as "/usr/app"
  • copy all files from host machine and do npm install
  • run index.js file as startup command
    13. Build docker image with name "testnodemysqlimg"
    14. Write Docker run command by linking "testmysql" container

Step 1: 
     > docker pull mysql:5.7
Step 2: 
     > docker run -d -p 3500:3306 -e MYSQL_ROOT_PASSWORD=mysql123 --name testmysql mysql:5.7
Step 3: 
     > docker ps
Step 4: 
     > docker exec -it testmysql mysql -u root -p

Step 6: 
     mysql> create database hr;
     mysql> use hr;
     mysql> create table employee(id int,name varchar(10));
     mysql> insert into employee values(1,'rama');
     mysql> select * from employee;

Step 10: 
     > npm install mysql

Step 11: 
var mysql = require('mysql');
var con = mysql.createConnection({
  host"db", // alias name of linking container
  user"root",
  password"mysql123",
  port:"3306",
  database:'hr'
});
con.connect(function(err) {
  if (errthrow err;
  console.log("mysql connected successfully");

});
con.end();

Step 12: 
FROM mhart/alpine-node
WORKDIR /usr/app
COPY package*.json ./
RUN npm install
COPY . .
CMD ["node""index.js"]

Step 13:
docker build -t testnodemysqlimg .

Step 14:
docker run --link testmysql:db testnodemysqlimg
  • -- link testmysql:db --> "testmysql" is the mysql container name and "db" is the alias name. So, alias name will  act as mysql hostname 
docker run --link testmysql testnodemysqlimg
  •  --link testmysql --> "testmysql" is the mysql container name and it act as mysql hostname


Happy Coding :)

Sunday, April 19, 2020

Docker Assignments #10: Docker, MySQL and .env file

docker .env file used for creating process level environment variables.

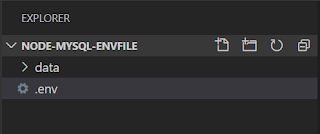
  1. Create a folder structure as per above image in the host machine
  2. add following content into .env file
  3. MYSQL_ROOT_PASSWORD=mysql123
    MYSQL_DATABASE=hr
    MYSQL_USER=hruser
    MYSQL_PASSWORD=hruser123
  4. Write docker run command by setting following options
  • enable detached mode
  • set container name as "testmysql"
  • map host port number to 3500
  • set env_file
  • do bind-mount from 'node-mysql-envfile/data' to container '/var/lib/mysql'
      5. Check testmysql container up and running
      6. Use docker exec and enter testmysql  container mysql cli client with root password
       7. Check “hr” database

Step 4: 
> docker run -d \
  -p 3500:3306 \
   --env-file .env   \
   --name testmysqldata 
   --mount type=bind,source=/c/Users/rama/node-mysql-envfile/data,target=/var/lib/mysql      
   mysql:5.7
  • -d --> used to run the container in detached mode
  • -p --> map host port 3500 to container port 3306
  • --env-file --> set .env file
  • --name --> set container name
  • we can take backup of mysql container data by doing mount to /var/lib/mysql folder
Step 5: 
     > docker ps

Step 6: 
     > docker exec -it testmysql mysql -u root -p

Step7: 
     mysql> show databases; ( you must see 'hr' database in the list )
   
Happy Coding :)


Docker Assignments #9: Docker, MySQL startup script and Backup

Docker containers are ephemeral i.e. any container data or configuration will be lost if the container is deleted or corrupted. However,  Docker Volume or bind-mount provide technique to persist container data. Later, we can spin-up new container with existing data.

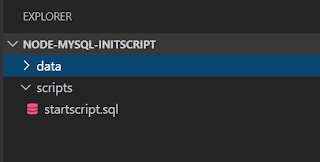
  1. Create a folder structure as per above image in the host machine
  2. add following content into startscript.sql
  3. create database hr;
    use hr;
    create table employee(id intname varchar(10));
    insert INTO employee VALUES(1,'rama');
  4. pull mysql:5.7 docker image into host machine
  5. Write docker run command by setting following options
  • enable detached mode
  • set container name as "testmysql"
  • map host port number to 3500
  • set MYSQL_ROOT_PASSWORD as “mysql123”
  • do bind-mount from 'node-mysql-initscript/scripts' to container '/docker-entrypoint-initdb.d'
  • do bind-mount from 'node-mysql-initscript/data' to container '/var/lib/mysql'
      6. Check testmysql container up and running
       7. Use docker exec and enter testmysql  container mysql cli client with root password
       8. Check “hr” database and “Employee” table with data
       9. Insert sample data into "employee" table
       10. stop and delete "testmysql" container
       11. run new mysql container named "testmysqldata" by doing bind-mount from 'node-mysql-               initscript/data' to container '/var/lib/mysql'
      12. Check testmysqldata container up and running
       13. Use docker exec and enter 'testmysqldata'  container mysql cli client with root password
       14. Check “hr” database and “Employee” table with data
       15. stop and delete "testmysqldata" container
       16. remove 'data' folder under 'node-mysql-initscript' in the host machine
       17. Create docker volume named as 'testmysqlvolume' and create
              docker run command by setting following options
  • enable detached mode
  • set container name as "testmysql"
  • map host port number to 3500
  • set MYSQL_ROOT_PASSWORD as “mysql123”
  • do bind-mount from 'node-mysql-initscript/scripts' to container '/docker-entrypoint-initdb.d'
  • do volume mount from 'testmysqlvolume' to container '/var/lib/mysql'
      18. Check testmysql container up and running
       19. Use docker exec and enter testmysql  container mysql cli client with root password
       20. Check “hr” database and “Employee” table with data
       21. Insert sample data into "employee" table
       22. stop and delete "testmysql" container
       23. run new mysql container named "testmysqlvolumedata" by doing volume mount from 'node-mysql-               initscript/data' to container '/var/lib/mysql'
      24. Check testmysqlvolumedata container up and running
       25. Use docker exec and enter 'testmysqlvolumedata '  container mysql cli client with root password
       26. Check “hr” database and “Employee” table with data

Step 4:
     > docker pull mysql:5.7   

Step 5:

> docker run -d \ 
-p 3500:3306 \
    -e MYSQL_ROOT_PASSWORD=mysql123 \
    --name testmysql \
    --mount type=bind,source=/c/Users/rama/node-mysql-initscript/scripts,target=/docker-entrypoint-initdb.d \
    --mount type=bind,source=/c/Users/rama/node-mysql-initscript/data,target=/var/lib/mysql      
    mysql:5.7
  • -d --> used to run the container in detached mode
  • -p --> map host port 3500 to container port 3306
  • -e --> set container ENV variables
  • --name --> set container name
  • .sh or .sql scripts will be executed after container started by doing mount to /docker-entrypoint-initdb.d folder
  • we can take backup of mysql container data by doing mount to /var/lib/mysql folder
Step 6: 
     > docker ps

Step 7: 
     > docker exec -it testmysql mysql -u root -p

Step 8: 
     mysql> show databases;
     mysql> use hr;
     mysql> select * from employee;
     mysql> insert into employee values(2,'krishna');
     mysql> select * from employee;

Step 10: 
     > docker rm -f testmysql

Step 11:    
> docker run -d \
  -p 3500:3306 \
  -e MYSQL_ROOT_PASSWORD=mysql123 \
  --name testmysqldata   
  --mount type=bind,source=/c/Users/rama/node-mysql-initscript/data,target=/var/lib/mysql      
  mysql:5.7

Step 12: 
     > docker ps

Step 13: 
     > docker exec -it testmysqldata mysql -u root -p

Step 14: 
     mysql> show databases;
     mysql> use hr;
     mysql> select * from employee;
     
Step 15: 
     > docker rm -f testmysqldata

Step 17: 
     > docker volume create testmysqlvolume
     > docker volume ls  
> docker run -d \
   -p 3500:3306 \
   -e MYSQL_ROOT_PASSWORD=mysql123 \
   --name testmysql       
   --mount type=bind,source=testmysqlvolume,target=/var/lib/mysql 
   --mount type=bind,source=/c/Users/rama/node-mysql-initscript/scripts,target=/docker-entrypoint-initdb.d  
   mysql:5.7
    
Step 19: 
     > docker exec -it testmysql mysql -u root -p

Step 20: 
     mysql> show databases;
     mysql> use hr;
     mysql> select * from employee;
   
 Happy Coding :)

Saturday, April 18, 2020

Docker Assignments #8: Docker, MySQL


  1. Pull mysql:5.7 docker image into host machine
  2. Write docker run command by setting following options
  • enable detached mode
  • set container name as "testmysql"
  • map host port number to 3500
  • set MYSQL_ROOT_PASSWORD as “mysql123”
      3. Check testmysql container up and running
       4. Enter container using docker exec
       5. Connect to database using mysql CLI client with root password 
       6. Create database with name “hr”
       7. Create table with name employee and “id, name” columns under “hr” database
       8. Insert sample data into employee table
      9. Connect to database using mysql UI client i.e. ( workbench or Dbeaver)
      10. Check “HR” database and “Employee” table with data
      11. Get testmysql container IP-address
      12. run another mysql container named as "testmysqlclient" and connect to "testmysql" server
      13. Create user defined bridge network (i.e. testnetwork )
      14. run mysql container named as "testmysql2" by attaching testnetwork
      15. run another mysql container named as "testmysqlclient2" and connect to "testmysql2" server
      16. check mysql container logs


Step 1: 
     > docker pull mysql:5.7

Step 2: 
> docker run -d
  -p 3500:3306 
  -e MYSQL_ROOT_PASSWORD=mysql123 
  --name testmysql mysql:5.7

Step 3: 
     > docker ps

Step 4: 
     > docker exec -it testmysql mysql -u root -p

Step 6: 
     mysql> create database hr;
     mysql> use hr;
     mysql> create table employee(id int,name varchar(10));
     mysql> insert into employee values(1,'rama');
     mysql> select * from employee;

Step 11: 
     > docker inspect testmysql

Step 12: 
     > docker run -it --name testmysqlclient mysql:5.7 mysql -h 172.17.0.2 -u root -p
    mysql> show databases; 
  • -h --> mysql server hostname (i.e. first container IP-address )
  • -u --> mysql user name
  • -p --> mysql password
Step 13: 
     > docker network create testnetwork

Step 14:   
> docker run -d
   -p 3500:3306 
   -e MYSQL_ROOT_PASSWORD=mysql123 
   --network testnetwork 
   --name testmysql2 mysql:5.7

Step 15:
> docker run -it
   --network testnetwork 
   --name testmysqlclient2 
   mysql:5.7 mysql -h testmysql2 -u root -p
  • -h --> mysql server hostname i.e. both containers are connected under user-defined bridge network.So, we can use hostname as IP-address or container name
Step 16: 
     > docker logs testmysql2


Happy Coding :)


Docker Assignments #7: Docker, Nginx and index.html


  1. Create a folder name it as "docker-nginx"
  2. Create a file with name “index.html”  under “docker-nginx” folder
  3. Add <p></p> tag with sample text in index.html file
  4. Pull nginx:alpine docker image into host machine
  5. Write docker run command by setting following options
  • enable detached mode
  • set container name as "helloworldnginx"
  • set container working directory i.e. /usr/share/nginx/html
  • do bind mount of “docker-nginx” folder from host machine to container /usr/share/nginx/html folder 
  • map host port number to 8200
       6. Go to http://localhost:8200 from host machine to verify index.html 
       
 Command:
> docker run -d -p 8200:80
   --name helloworldnginx 
   --mount type=bind,source=/c/Users/rama/docker-nginx,target=/usr/share/nginx/html
   nginx:alpine  (or)

 > docker run  -d  -p 8200:80
   --name helloworldnginx 
   --mount type=bind,source=$(pwd),target=/usr/share/nginx/html 
   nginx:alpine  

(i.e. pwd should be docker-nginx folder)

  • -d  --> used to run container in detached/background mode
  • -p 8200:80  --> map host port number 8200 to container port 80 ( i.e. nginx expose port 80 by default )
  • /usr/share/nginx/html --> nginx default site enabled folder
Note : https://github.com/nginxinc/NGINX-Demos is a official nginx git repo and has awesome demos 

Happy Coding :) 


Docker Assignments #6: Docker, Node and helloworld.js

  1. Create a folder with name it as “docker-helloworld” in your host machine
  2. Create a file with name “helloworld.js”  under “docker-helloworld” folder
  3. Add console.log statement with sample message in helloworld.js file
  4. Pull alpine node docker image into your host machine
  5. Write docker run command by setting following options
  • set container name as "nodehelloworld"
  • set container working directory i.e. /usr/app
  • do bind-mount of “docker-helloworld” folder from host machine to container /usr/app folder
  • run hello-world.js
      6. Check console.log message on the terminal

 Command:
> docker run
   -w /usr/app
   --mount type=bind,source=/c/Users/rama/docker-helloworld,target=/usr/app
   --name nodehelloworld
   mhart/alpine-node node helloworld.js 

  (or)
> docker run 
  -w //usr/app 
  --mount type=bind,source=$(pwd),target=/usr/app 
  --name nodehelloworld  
  mhart/alpine-node node helloworld.js
  • -w  --> used for setting container working directory
  • --mount --> used for bindmount/volume
  • --name --> used for specifying container name
  • mhart/alpine-node  --> alpine node image
  • node helloworld.js --> run node command in the container

Happy Coding :)


Docker Assignments #2 : Container Linking

Docker Linking feature help to communicate containers each other and transmit data by using container name.
As mentioned in the previous post ( i.e. Default Bridge Network  ), All containers under default bridge network will be communicated only by using container IP-address

Docker Linking help to communicate containers each other by using container name
  1. Create alpine container(let us name it as 'alpine1') using default bridge network
  2. Create another alpine container (let us name it as 'alpine2')  and link 'alpine1' using docker linking
  3. Get IP-addresses of both the containers
  4. Enter into 'alpine2' container using interactivemode
  5. ping 'alpine1' container using IP-address 
  6. ping 'alpine1' container using container name
Step 1:
  By default all containers  will be created using default bridge network
     > docker run -itd --name alpine1 alpine     

Use below command to check both containers are up and running
     > docker ps

Step 2:
  Use  --link attribute for linking containers
     > docker run -itd --name alpine2 --link alpine1 alpine     

Step 3:
    use below command to get container IP-address
     > docker inspect alpine1
     > docker inspect alpine2

Step 4:
  Use below command to enter running container using interactive mode
     > docker exec -it alpine2 sh

Step 5:  
    Ping alpine1 container using IP-address
      # ping -c 2 172.17.0.4  (i.e. ping will be successful )

Step 6:  
  Ping alpine1 container using name
      # ping -c 2 alpine1  (i.e. ping will be successful )

-> Docker adds a host entry for the source container in the /etc/hosts file ( i.e. apline1 container id and name gets added in the alpine2 -  etc/hosts file)
-> By default ,  Container ENV variables will be shared across linking containers

Happy Coding :)


Docker Assignments #1 : Default Bridge Network


  1. Create two alpine containers with default bridge network
  2. Verify if both containers are associated with bridge network
  3. Get IP-addresses of both the containers
  4. Enter into the first container through interactive mode
  5. ping second container using IP-address 
  6. ping second container using container name

Step 1:
  By default all containers  will be created under default bridge network
     > docker run -itd --name alpine1 alpine
     > docker run -itd --name alpine2 alpine

Use below command to check both containers are up and running
     > docker ps

Step 2:
Use below command to check both containers are associated with bridge network
    > docker inspect bridge


Step 3:
    use below command to get container IP-address
     > docker inspect alpine1
     > docker inspect alpine2

Step 4:
  Use below command to enter running container using interactive mode
     > docker exec -it alpine1 sh

Step 5:  
      # ping -c 2 172.17.0.5  (i.e. ping will be successful )

Step 6:  
      # ping -c 2 alpine2  (i.e. bad address 'alpine2' )

i.e. All the containers under default bridge network will be communicated only by using container IP-address

Happy Coding :)

Docker Assignments #5: Docker Bind Mount

By using a bind mount, a file or directory on the host machine is mounted into a container
  1. Create a folder structure as per above image in your host machine
  2. Run an alpine container (name it as 'alpine1')  in interactive-mode and make a note of all files/folders under container "usr" folder
  3. delete alpine1 container
  4. Run an alpine container (name it as 'alpine1') in interactive-mode by doing bind mount (i.e. “dokcer-bindmount” folder from the host machine ) to container “usr” folder
  5. Make a note of all files/folders under "usr" folder of 'alpine1' container
  6. Observe what happens to container built-in folder/files under “usr” folder
  7.  Change the content in file1.txt file under /usr/folder1/file1.txt
  8. Check file1.txt whether changes are reflecting in your host machine or not
  9. Change the content in file2.txt file under docker-bindmount/folder2/file2.txt from host machine
  10. Check whether same changes are reflecting under container /usr/folder2/file2.txt
  11. stop and remove alpine1 container
  12. Check whether changes are still exist in host machine
  13. Do bind mount to container non-exist folder
  14. Implement read-only bind mount
  15. Observe the Disadvantage of doing bind mount to container non-empty/built-in folder
Step 2:
     > docker run -it  --name alpine1 alpine sh  

Step 3: 
     > docker rm -f alpine1

Step 4:    
> docker run -it
  --mount type=bind,source=/c/Users/rama/docker-bindmount,target=/usr 
  --name alpine1 alpine sh  (or)
> docker run -it 
  --mount type=bind,source=$(pwd),target=/usr 
  --name alpine1 alpine sh

Step 6: 
     container preexist contents will be hidden and not accessible to host machine

Step 7: 
     append "hello world" message to file1.txt
     > docker exec -it alpine1 sh
     > / # cd /usr/folder1
     > /usr/folder1 # echo "hello world" >> file1.txt

Step 8: 
     file1.txt changes should be reflected in host machine

Step 10: 
     file2.txt changes should be reflected in alpine1 container

Step 11: 
     > docker rm -f alpine1

Step 12: 
     all file changes must remain same

Step 13: 
    directory will be created automatically if not exist in the container   
> docker run -it
  --mount type=bind,source=/c/Users/rama/docker-bindmount,target=/rama 
  --name alpine1 alpine sh  (or)

> docker run -it 
  --mount type=bind,source=$(pwd),target=/rama 
  --name alpine1 alpine sh 

Step 14: 
    By making container read-only, we can't create or modify contents in the container
> docker run -it
  --mount type=bind,source=/c/Users/rama/docker-bindmount,target=/rama,readonly 
  --name alpine1  alpine sh (or)

> docker run --read-only 
  --name alpine1 alpine touch file1.txt ( i.e. file won't be created )

Step 15: 
  1. If you bind-mount into a non-empty Linux builtin directory (i.e. bin,usr,tmp and etc ) on the container, the directory’s existing contents are obscured/hidden by the bind mount. So, this results in a non-functioning container
Happy Coding :)