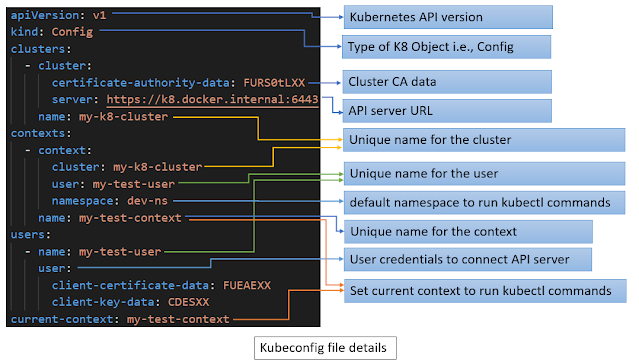
Kubeconfig file
kubeconfig file contains four major sections
- clusters: it contains list of cluster details like name of the cluster, API server URL, Certificate Authority (CA) file, etc.
- users: it contains list of user credentials (like name, password, user token, certificate) for connecting an API server
- contexts: it contains combination of cluster name, user name and namespace. It is used for kubectl CLI when executing commands against k8
- current-context: Always one combination of context (i.e. name of cluster, user, namespace) must be set as current context. (i.e. cluster name + user name + namespace name )
run following command to view kubeconfig file details
$ kubectl config view
apiVersion: v1
kind: Config
clusters:
- cluster:
certificate-authority-data: FURS0tLXX
server: https://k8.docker.internal:6443
name: my-k8-cluster
contexts:
- context:
cluster: my-k8-cluster
user: my-test-user
namespace: dev-ns
name: my-test-context
users:
- name: my-test-user
user:
client-certificate-data: FUEAEXX
client-key-data: CDESXX
current-context: my-test-context
// display all contexts
$ kubectl config get-contexts
CURRENT NAME CLUSTER AUTHINFO NAMESPACE
* my-test-context my-k8-cluster my-test-user dev-ns
// display current context
$ kubectl config current-context
my-test-context
// display pods
$ kubectl get po
NAME READY STATUS RESTARTS AGE
pod-nginx-dev-ns 1/1 Running 0 4m4s
// modify namespace for the given context
$ kubectl config set-context my-test-context --namespace=dev2-ns
Context "my-test-context" modified.
// the below command display all pods from the dev2-ns namespace
$ kubectl get po
NAME READY STATUS RESTARTS AGE
pod-nginx-dev2-ns 1/1 Running 0 1m4s
Create new Context
- Cluster details: use following kubectl command to configure new cluster details
// syntax
// kubectl config set-cluster <cluster-map-name> --server=<cluster-url> --certificate-authority=<ca-file>
$ kubectl config set-cluster my-new-cluster \
--server=https://mycluster.k8.com:6443 \
--certificate-authority=/path/cafile
Cluster "my-new-cluster" set.
use following kubectl command to configure new user details
// syntax
// kubectl config set-credentials <user-map-name> --token=<user-token-info> (or)
// kubectl config set-credentials <user-map-name> --username=<username> --password=<password>
$ kubectl config set-credentials my-new-user --token=token1234abcd
User "my-new-user" set.
3. Namespace details:
use following kubectl command to view namespace details
// display all namespaces
$ kubectl get ns
NAME STATUS AGE
default Active 31d
dev2-ns Active 47m
dev-ns Active 47m
// syntax
// kubectl config set-context <context-name> \
--cluster=<cluster-name> \
--user=<user-name> \
--namespace=<namespace-name>
$ kubectl config set-context my-new-context \
--cluster=my-new-cluster \
--user=my-new-user \
--namespace=dev-ns
Context "my-new-context" created.
//display all contexts
$ kubectl config get-contexts
CURRENT NAME CLUSTER AUTHINFO NAMESPACE
* docker-desktop docker-desktop docker-desktop
my-new-context my-new-cluster my-new-user dev-ns
// display current context
$ kubectl config current-context
docker-desktop
Use following kubectl command to switch the context
// change the context
$ kubectl config use-context my-new-context
Switched to context "my-new-context".
By default, the following kubectl command display all the pods from dev-ns namespace because CLI using "my-new-context" as current-context
// display pods
$ kubectl get po
NAME READY STATUS RESTARTS AGE
pod-nginx-dev-ns 1/1 Running 0 4m4s
Use following kubectl command to delete the context
// delete context
$ kubectl config delete-context my-new-context
deleted context my-new-context from ~\.kube\config
Kubernetes for Developers Journey.
- Kubernetes for Developers #25: PersistentVolume and PersistentVolumeClaim in-detail
- Kubernetes for Developers #24: Kubernetes Volume hostPath in-detail
- Kubernetes for Developers #23: Kubernetes Volume emptyDir in-detail
- Kubernetes for Developers #22: Access to Multiple Clusters or Namespaces using kubectl and kubeconfig
- Kubernetes for Developers #21: Kubernetes Namespace in-detail
- Kubernetes for Developers #20: Create Automated Tasks using Jobs and CronJobs
- Kubernetes for Developers #19: Manage app credentials using Kubernetes Secrets
- Kubernetes for Developers #18: Manage app settings using Kubernetes ConfigMap
- Kubernetes for Developers #17: Expose service using Kubernetes Ingress
- Kubernetes for Developers #16: Kubernetes Service Types - ClusterIP, NodePort, LoadBalancer and ExternalName
- Kubernetes for Developers #15: Kubernetes Service YAML manifest in-detail
- Kubernetes for Developers #14: Kubernetes Deployment YAML manifest in-detail
- Kubernetes for Developers #13: Effective way of using K8 Readiness Probe
- Kubernetes for Developers #12: Effective way of using K8 Liveness Probe
- Kubernetes for Developers #11: Pod Organization using Labels
- Kubernetes for Developers #10: Kubernetes Pod YAML manifest in-detail
- Kubernetes for Developers #9: Kubernetes Pod Lifecycle
- Kubernetes for Developers #8: Kubernetes Object Name, Labels, Selectors and Namespace
- Kubernetes for Developers #7: Imperative vs. Declarative Kubernetes Objects
- Kubernetes for Developers #6: Kubernetes Objects
- Kubernetes for Developers #5: Kubernetes Web UI Dashboard
- Kubernetes for Developers #4: Enable kubectl bash autocompletion
- Kubernetes for Developers #3: kubectl CLI
- Kubernetes for Developers #2: Kubernetes for Local Development
- Kubernetes for Developers #1: Kubernetes Architecture and Features

